Mastering WooCommerce API Integration: A Comprehensive Guide to Secure OAuth1 Authentication in Next.js


📗 In today's rapidly evolving e-commerce landscape, ensuring the security of your online store's data and transactions is crucial. One powerful way to achieve this is by using OAuth1 authentication for your WooCommerce API integration. In this article, we'll guide you through the process of implementing OAuth1 authentication within a Next.js application to securely fetch product data from your WooCommerce store.
Benefits of OAuth1 over Basic Authentication
OAuth1 offers several key advantages over the basic authentication method (consumer key and secret):
Credential Exposure Reduction: OAuth1 avoids directly exchanging your credentials between your application and WooCommerce. Instead, tokens are used to reduce the risk of exposure.
Granular Control: With OAuth1, you can define specific permissions and access levels for your application. This way, your app only accesses the resources it truly needs, adhering to the principle of least privilege.
Token Expiry: OAuth1 tokens have a limited lifespan. Even if an unauthorized entity gains access to a token, it remains valid only for a short time, minimizing the window of opportunity for misuse.
Implementing OAuth1 for WooCommerce API Integration in Next.js
Here's a comprehensive guide to integrating OAuth1 authentication within a Next.js application to fetch product data from a WooCommerce store:
Step 1: Prepare Your WooCommerce Store (if you don't have the consumer key and secret already)
Log in to your WooCommerce admin panel.
Go to WooCommerce > Settings > Advanced > REST API.
Generate API keys (Consumer key and Consumer secret).
Step 2: Set Up the Next.js API Route
In your Next.js project, create an API route to fetch WooCommerce product data securely. Here's an example of what the code might look like:
// pages/api/products.ts
import type { NextApiRequest, NextApiResponse } from "next";
import { CONSUMER_KEY, CONSUMER_SECRET, SITE_URL } from "../settings/credentials";
import { OAuthAuthorization } from "@/utils/wc.auth";

type Data = {
  name: string;
};

export default async function handler(
  req: NextApiRequest,
  res: NextApiResponse<Data>
) {
  if (req.method !== "GET") {
    return res.status(405).end();
  }

  if (!CONSUMER_KEY || !CONSUMER_SECRET) {
    return res.status(401).end();
  }

  const request_data = {
    url: `${SITE_URL}/wp-json/wc/v3/products`,
    method: "GET",
  };

  // Note: OAuthAuthorization functions is declared in utils directory
  const authorizationHeaders = OAuthAuthorization({
    requestBody: request_data,
    credentials: { consumerKey: CONSUMER_KEY, consumerSecret: CONSUMER_SECRET },
  });

  try {
    const response = await fetch(request_data.url, {
      method: request_data.method,
      headers: { ...authorizationHeaders },
    });
    const data = await response.json();

    return res.status(200).json(data);
  } catch (error: any) {
    console.log("Error:", { error });
    return res.status(error.status || 500).json(error);
  }
}
// utils/wc.auth.ts
import OAuth from "oauth-1.0a";
import crypto from "crypto";

// type Request =
interface Props {
  requestBody: {
    method: string;
    url: string;
  };
  credentials: {
    consumerKey: string;
    consumerSecret: string;
  };
}
export const OAuthAuthorization = ({
  requestBody,
  credentials,
}: Props): OAuth.Header => {
  const oauth = new OAuth({
    consumer: {
      key: credentials.consumerKey,
      secret: credentials.consumerSecret,
    },
    signature_method: "HMAC-SHA1",
    hash_function(base_string, key) {
      return crypto
        .createHmac("sha1", key)
        .update(base_string)
        .digest("base64");
    },
  });

  return oauth.toHeader(oauth.authorize(requestBody));
};
Step 3: Test and Display
After creating the API route, test it locally to ensure that it fetches product data securely using OAuth1 authentication. Once tested, display your data on the front end.
Bonus Tip🚀: Keep API Calls off the Frontend
It's crucial to safeguard your credentials when integrating WooCommerce APIs. Avoid making API calls directly from the frontend of your application. Why? When you do so, these calls are easily accessible through browser developer tools. This means that anyone can view your sensitive credentials just by checking the network tab.
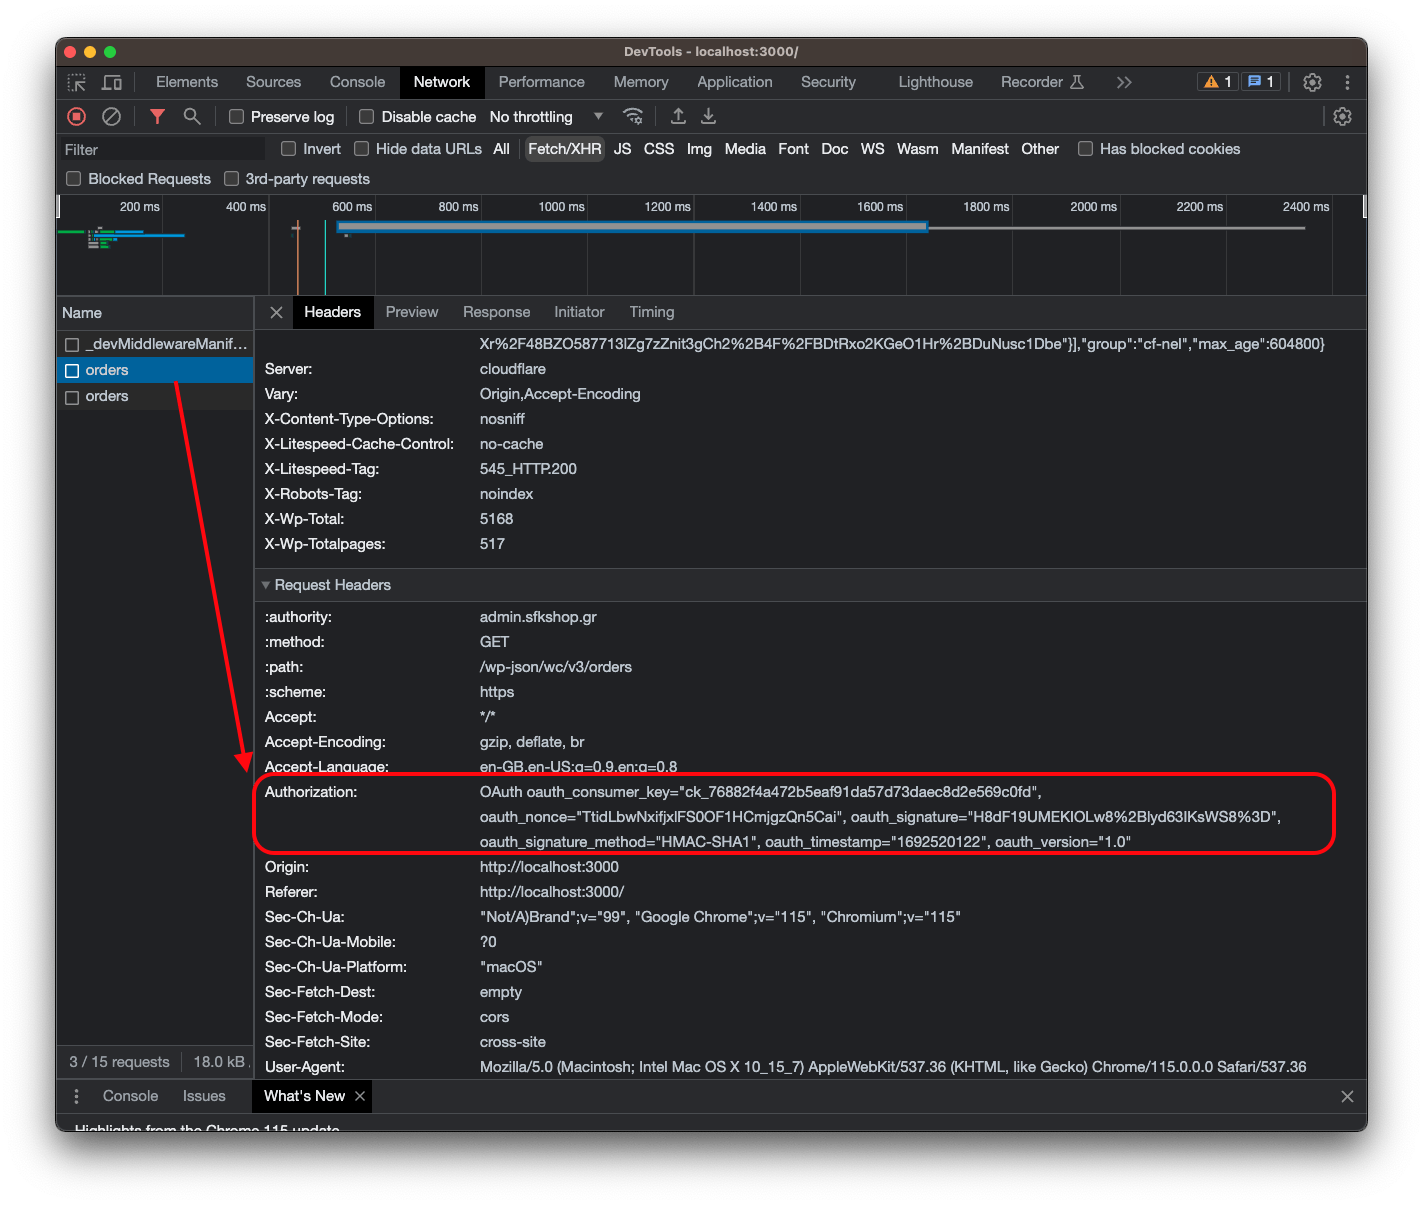
Imagine a situation where a potential attacker sees your OAuth1 credentials exposed in the network requests. Even though OAuth1 adds security layers, this exposure could lead to unauthorized access to your WooCommerce store.
To prevent this, always perform API calls involving sensitive data on the server-side. For Next.js apps, use server-side or API routes. These routes ensure your credentials stay hidden from prying eyes and your WooCommerce API interaction remains secure. Remember, a little precaution goes a long way in keeping your online store safe.
Conclusion 🎯
👉 OAuth1 authentication offers a robust security solution for WooCommerce API integrations. By minimizing credential exposure, enabling precise control, and incorporating token expiration, OAuth1 enhances the security of your online store's data and operations. By following the steps outlined in this guide, you can implement OAuth1 authentication within your Next.js application (also Node.js), ensuring that your WooCommerce API interactions remain both efficient and secure.
🎯 With e-commerce security at the forefront, embracing OAuth1 is a proactive step towards safeguarding your customers' trust and your business's reputation. So go ahead and strengthen your WooCommerce API integration with OAuth1 today 💪.
Refer to the Official Documentation:
For comprehensive details, best practices, and updates related to the WooCommerce API and OAuth authentication, it's recommended to refer to the official WooCommerce documentation.